

Hello, I'm Deana from Dreamworthy Quilts and welcome to the THIRD tutorial for the Fort Worth Fabric Studio Shimmer Braid QAL. The first and second tutorials can be found at the links below:
It is FREE so come sew along! This is the third of five months, and the remaining tutorials will follow on the second Tuesday of each month.
Here is what we are making. It is 70" x 70" with adaptations for a queen sized quilt.

Here is how the Queen size will look. It is 86" x 96". The final white border can be larger if desired.

As a reminder, Fort Worth Fabric Studio has a great linky party on Fridays where we would love to see your progress on this or any project you are working on.
------------------------------------------------
Tutorial for Month 3


Fabric Selection for Month 3 Blocks


IMPORTANT
NOTE: THIS QUILT WAS MADE FROM FAT
QUARTERS AND ALL STRIPS ARE BASED ON 20” LONG PIECES. CUT ALL STRIPS 20” LONG, NOT 18”.

Add a 1 ½” x 14 ½” white rectangle to the sides as shown. Next, add a 1 ½ x 15 ½” rectangle to the bottom.


Make 4 braids with purple points like the one below.
Make 8 braids with white points like the one below.
Block Size
5” x 17” = Finished Block Size. Finished means after it is sewn into the
quilt.
5 ½” x 17 ½” = Unfinished
Size. Unfinished
means before you sew it into the quilt – when it is just a block by
itself.
Fabric Selection for Month 3 Blocks
Lay 8 fat quarters out in the order you want your braid colors to be. Label them Braid 1 through Braid 8.
Above is a diagram to show color placement. It has a purple point.
Below is a photo of a real block with a white point.
Cutting Instructions
IF YOU ARE NOT
USING FAT QUARTERS YOU CAN CUT HALF AS MANY STRIPS.
From EACH of the 8 braid fabrics cut and label the following:
(2) 4 ½” x 20” strips –
set one of EACH fabric aside for the strip units
Cut this Number
|
This size
|
Label it
|
Note
|
From the remaining 4 ½” strips cut the
following:
|
If you are careful you can get 12 pieces per
strip. If you only get 11, cut a 1 ¾” x
20” strip (NOT a chunk off the end) to cut the needed pieces. It is vital
that the left over fabric stays 20” long for the final quilt blocks to
work out.
|
||
12 from EACH fabric
|
4 ½” x 1 ¾”
rectangles
|
Braid #
Associated with the fabric
(1-8)
|
|
Purple Fabric
Cut (4) 1 ¾” squares and label them “Purple Squares Braid #8”
White Fabric – Use 42” strips NOT FAT QUARTERS
Cut (2) 6 ½” x 42”
strip
Cut (4) 1 ¾” x 42”
strips
Snip the (4) 1 ¾”
strips in half to yield (8) 1 ¾” x 21” strips – label them “strip units”
Cut (8) 1 ½” strips
Cut (4) 7 ½” strips
Cut this Number
|
This size
|
Label them
|
Note
|
From one of the 6 ½’
strips cut the following.
|
|||
6
|
6 ½” squares
|
||
Cut each of these
squares through the diagonal to yield 12 triangles
|
|||
12
|
triangles
|
triangles
|
 |
From the remaining 6
½” strip cut and label the following:
|
|||
2
|
6 ½” squares
|
4 corner braids
|
|
4
|
4” squares
|
Purple tipped noses
|
|
Cut each of these
squares through the diagonal to yield 4 larger triangles and 8 smaller ones.
|
|||
 |
|||
Cut this Number
|
This size
|
Label them
|
Note
|
From the 1 ½’ strips
cut the following.
|
|||
4
|
1 ½” x 21 ½”
|
21 ½”
|
It is recommended that
you cut a 21 ½” and a 15 ½” out of the same strip because you might not get
two 21 ½” pieces out of one strip.
|
4
|
1 ½” x 15 ½”
|
15 ½”
|
|
4
|
1 ½” x 20 ½”
|
20 ½”
|
|
4
|
1 ½” x 14 ½”
|
14 ½”
|
|
From the 7 ½” strips
cut and label the following:
|
|||
12
|
7 ½” squares
|
7 ½” squares
|
You will use 4 this month and the other 8 at a later time.
|
4
|
7 ½” x 14 ½”
|
7 ½” x 14 ½”
|
|
Making the corner blocks
Make two of each diagram below. Sew from the end in the direction of the arrow but STOP sewing at the end of the arrow. DO NOT complete the seam. It will be finished later.
Add a 1 ½” x 14 ½” white rectangle to the sides as shown. Next, add a 1 ½ x 15 ½” rectangle to the bottom.
Making the Braid Blocks
1. Locate the Braid #8 4 1/2" strip. From this strip cut off (4) 1 3/4" x 4 1/2" rectangles.
2. Sew the Braid #8 rectangles to the (4) 1 3/4" "Purple Square Braid #8" pieces.
3. Press
them away from the purple squares. Label
them Braid #8 for reference later.
4. Sew
a 1 ¾” white strip to what is left of the Braid #8 4 ½” strip.
5. Press
away from the white.
6. Make 1 ¾” sub cuts.
You will need eight units. If you
cannot get all 8, cut a 1 ¾” white square and a 4 ½” x 1 ¾” braid fabric and
sew them together.
7. Sew
a 1 ¾” white strip to all of the
remaining 4 ½”
braid fabric strips.
8. Press away from the white.
9. Make 1 3/4" sub cuts. You will need twelve per strip unit.
10. You
will need 12 units from each strip. If
you can only get 11 units, cut an extra 1 ¾” square of white and a 1 ¾” x 4 ½”
rectangle of the braid fabric and sew them together to create a unit.
11. Join
a white triangle to a Braid #1 1 ¾” x 4 ½” rectangle as shown. Make 12.
12. Add a Braid #1 unit to the other side of the white triangle.
13. Now add a Braid #2 rectangle.
Continue to alternate between rectangles and units in numerical order
until the braids are completed. Remember
to make four braids with purple noses.
14. Trim
2 ¾” off of both sides of center on the braids.
This will make the width of the braids 5 ½”. These blocks easily curve out of shape
because the outside edges are all bias.
You can easily force the block to line up on the 2 ¾” line by moving it
where it needs to be.
15. Add
a white triangle labeled “Purple tip
noses” to the nose of ONLY THE purple nosed blocks.
16. Trim off the excess.
17. Add
the other white triangle to the purple nosed blocks and trim off the excess.
18. Trim the length of the braids to 17 ½” long. Leave ¼” of white fabric away from the noses
when trimming the 17 ½” length. The
other end (right end in the diagram) will have excess white (more than what the
diagram shows).
19. Set
the purple nosed braids aside for the final month’s tutorial.
20. Join
the white nosed braids together in pairs as shown below. Make 4 pair.
A “Y-seam”
will have to be sewn at the corner. See
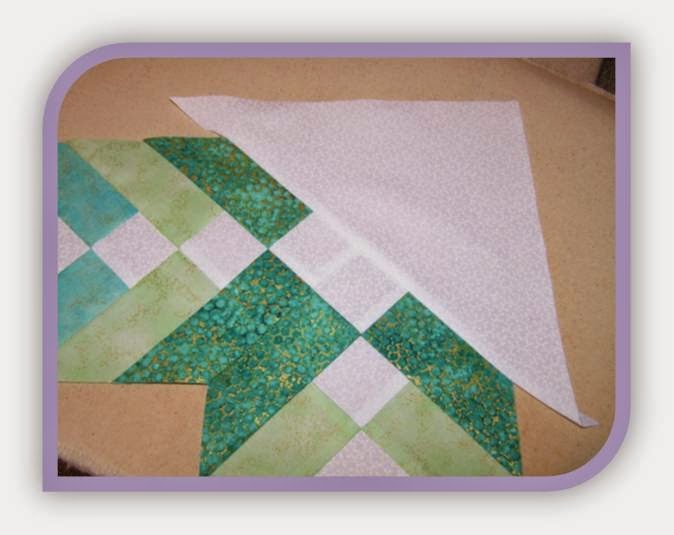
the instructions below to learn how to do this. You can also go to this link on youtube or search for "How to Sew a Basic Y-Seam in a Quilt Block by Edyta Sitar of Laundry Basket Quilts" and watch how to do a Y-seam.
21. Begin the Y-seam by marking the 1/4" intersection of the seam. I marked it in red on the wrong side of BOTH pieces.
22. Put
a pin in the exact point where the two lines intersect. Put the pin into the same point on the other
piece and pin them right sides together.
Begin wing from that exact pin point and back
stitch. Do not go even one stitch beyond the point.
23. Finish
the seam like normal on the other end where the white squares come
together.
24. Add a white triangle labeled "4 corner braids" to the corner. It will be too large. Just center it on the corner.
25.Trim
to a perfect right angle.
26. Trim
each end of
the braid to 20 ½” long as shown.
27. Add a 1 ½” x 20 ½” white rectangle to the side and a 1 ½” x 21 ½” white rectangle to the bottom.
28. Sew
the braids to white corner blocks using y-seams as described above. Remember to mark the perfect ¼” corner on the
wrong side of the white corner. Pin that
point to the point where the stitching began on the braids.

4 comments:
Hi
You say "If you are careful you can get 12 pieces per strip. If you only get 11, cut a 1 ¾” x 20” strip (NOT a chunk off the end) to cut the needed pieces."
However, my calculator says 12 x 1 3/4 = 21" not 20"
So no one will be able to get 12 pieces per 20" strip
Please correct me if I misunderstand.
Hello Mary, you are correct. I generalized the strip at 20" long but a fat quarter really could be anywhere from 20" to 21 1/2" long depending on the fabric width. I was able to get 12 pieces out of some of my strips but others I could not.
I hope this clarifies things.
Have I missed something? Is there a block(s) for April? I can't find the tutorial if so. Thanks.
I can't seem to find tutorials #4 and #5 for the Shimmer Braid QAL.... where may I find these?
thank you....
Post a Comment