
Hi there! I hope you all had a good weekend! We had a busy weekend with my oldest daughter's birthday and I spent a lot of time on some upcoming projects!
I have been busy making fall decorations for our home. I love decorating for Autumn! I have quite a few decorations for Halloween, but not a ton for specifically fall. So I decided I needed to make a little something for our kitchen to celebrate fall!
I designed this Pumpkin Patch Block and thought it was perfect for a fun little table topper!

This was a really easy block to put together, and I really enjoyed making it. It's a great scrap-buster project! If you have orange scraps in your scrap bins--this would the perfect project to use those up. I used a variety of orange prints, light and dark to give the pumpkin lots of scrappiness!

I quilted the pumpkin with 1/4" lines--I just followed the shape of the pumpkin. I did the same with the stem. For the cream, I just did a small loopy-loop pattern. I also used all my scraps to do a scrappy binding!

Alright, let's make this block!


Take one set of your squares and place them right sides together. Lining up all the edges. Pin into place. (Diagram 1)
Draw a diagonal line from one corner to the opposite corner. (Diagram 2)
Sew a 1/4 seam on either side of your drawn line and then using a ruler and rotary cutter, cut along your drawn line. (Diagram 3)
You now have to pieces, Press them open and then trim them to 3.5" square. (Diagram 4)
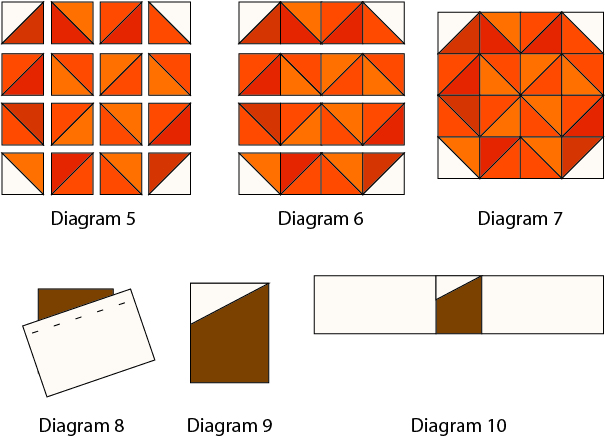
Place your half square triangles in the pattern you see in Diagram 5.
Sew your blocks into rows first. You will have four rows. Press your rows. (Diagram 6)
Now sew your rows together. Press your block. Block should measure 12.5" x 12.5" at this point. (Diagram 7)
Making the stem of the pumpkin.
Take the brown 3.5" x 4" piece and a 4" x 5" piece of cream and lay them right sides together as shown in Diagram 8. And sew a seam a 1/4" from the top of the cream fabric.
Open up sewed piece, trim off excess cream, using the brown piece underneath as a template. Then trim off the excess brown. You should now have your stem (Diagram 9)
Take a 4" x 5" cream piece and place right sides together with your stem piece. Then add the other 4" x 5" cream piece and sew to the opposite side. You will now have your stem row.

Sew your stem strip on the top and the 2.5" x 12.5" strip on the bottom. Diagram 12
Sew your left and right 16.5" x 2.5" strips on.
Press your block.
That's it! You're done!
Now you can do whatever you please with your block! You can make it into a table topper (which is what I decided to do. You could make it into a pillow, you could make a few of these pumpkins and even make a table runner! Your options are endless with this fun little block!
You could even make the pumpkin smaller or larger, just by making your half square triangles bigger or smaller. You can really change this up to fit your style! :)
I have put this table topper on my kitchen table, and it looks so festive for fall! Now I'm off to make some more fall decorations!
Talk to you soon,


4 comments:
This is already my favorite new thing for fall! I am heading over to my fabric stash to see what kind of orange goodness I can find. Thanks so much for sharing this wonderful miniquilt tutorial!
I love this pattern! Thank you for sharing!
its precious just what I was looking for... thank you
This is so cute! Thank you.
Post a Comment