Showing posts with label Tutorial. Show all posts

Tuesday, June 16, 2015

Baby Bibdanas Tutorial

Hi there! It's me, Trina from Will Cook for Shoes - back with another fun fabric project!


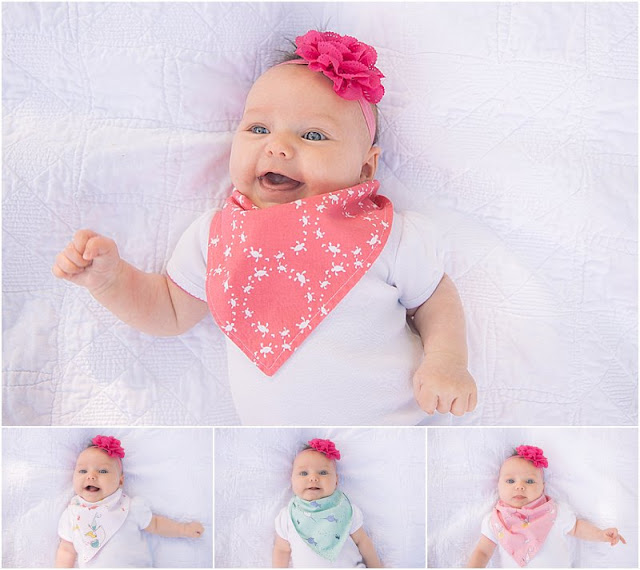
Maybe you've seen these around - Baby Bibdanas! Bibdanas are the new baby bibs and not only are they super adorable, they are also super easy to make.


My little niece Tess will be turning three months this week and is getting into the drool phase (sorry to air that on the blog, sweetie!). And so some Bibdanas were in order.


As soon as I saw Riley Blake's Saltwater Collection, I knew Tess needed a set of Bibdana's from all these fabrics in the line. The saturated colours and adorable designs are just perfect (my favourite being the little turtles) but what is also extra special about this line is the fabric is so soft.

I washed all my fabrics before I set about making the Bibdanas.

Do you wash your fabrics before you sew?

My general rule is if I'm garment sewing, I pre-wash. This way if anything is going to shrink, it's hopefully done that before I start cutting and sewing. And generally if I'm quilting I don't pre-wash. My rule about this is because I always wash my quilts before I give them away to make them nice and soft, as well as test for colour fastness and that are my seams withstand a good wash.

Being that these fabrics were going to be used to make something for little Tess, I pre-washed them and the fabric got even softer. Perfect for wiping sensitive baby chins, bitty noses and rosy cheeks.

For each Bibdana, you need:
- two pieces of fabric, to cut out fabric - fold right sides together and cut out a 10 inch triangle with one of the short sides of the triangle positioned on the fold
- a piece of velcro, 1 inch by 1/2 inch
- thread for sewing

I used two contrasting pieces of fabric to add interest. These Bibdanas will be reversible when you are finished.

These are my two pieces of fabric opened up after being cut with the short side of the 10-inch triangle on the fold.


Next, place your two pieces of fabrics right sides together.


Using a 1/4 inch seam, stitch all the way around except for leaving a 2 inch opening so that you can turn your Bibdana right side out.


Clip the corners from each tip so that they are close to the stitching (to reduce bulk) and turn right side out. Fully push out each corner, use a blunt tip if needed. Press the Bibdana to make the edges flat and also to turn in the seam on the 2 inch portion you left open.

Topstitch around all three sides to give a nice finish to the Bibdana and to close off the open seam.


Take each piece of velcro and place on the tips of the long edge of the Bibdana. To make the Bibdana lie flat when it's being worn, you'll want to put one piece on the "front" piece of Bibdana and one piece on the "back" side of Bibdana.


Stitch around all sides of the velcro to secure. I found some non-adhesive velcro for this project. The last time I used velcro with a bit of adhesive on the back I still had to stitch it down to make it stay secure and the adhesive gummed up the needle on my machine. I was MUCH happier with the results this time around and because this is a decent size piece of velcro, it's easy enough to hold and keep it in place while it was stitched in place.

I clipped the corners of my velcro so that they didn't stick out from the tips of the long edge of the Bibdanas.


Final step, thorough testing by my sweet little niece, Tess!


This was such a quick and practical little project. This little one's Mom has already said the Bibdanas have saved the car seat from a little incident and Tess's clothes are keeping dryer as she goes through her little drool phase.


I can see myself making a lot more of these in the future!

Tuesday, May 19, 2015

DIY Bag with Zipper Pocket {Free Pattern}

Hi there! You know when you see a fabric, and you immediately know what you want to make with it?  Well that happened to me when I saw this lovely print from Katarina Roccella's newest line Skopelos.  It combines two of my favorite things: stripes and flowers.  So naturally, I knew I had to make a bag out of it! :) 

Click HERE to purchase the kit! - sold out

This is an easy bag with a simple zip pocket in the front! Don't shy away from it because it has a zipper!  Putting the zipper in this bag is way easier than it looks, and you will love the finished result! And you will wonder why you haven't tried putting a zipper in a bag before, because it is so simple!


The other fantastic part about this bag is that there are not pattern pieces to cut out and pin to your fabric! Everything is cut out as squares and rectangles...so that alone saves you so much time! I whipped this up in about two hours, which is pretty fast for bag making!


The bag is fully lined, with the loveliest fabric! I love the modern vibes and colors of this line of fabric, and I couldn't be happier with how they play so well with each other in this bag!


I am definitely going to make a few of these bags! They would be great for gifts too! :)

Talk to you soon,


Sunday, May 17, 2015

Exposed Lace Zipper Pouch {Tutorial}

Hi there!  I hope you are all enjoying your weekend! Today I have a darling zipper pouch to show you guys! :)  

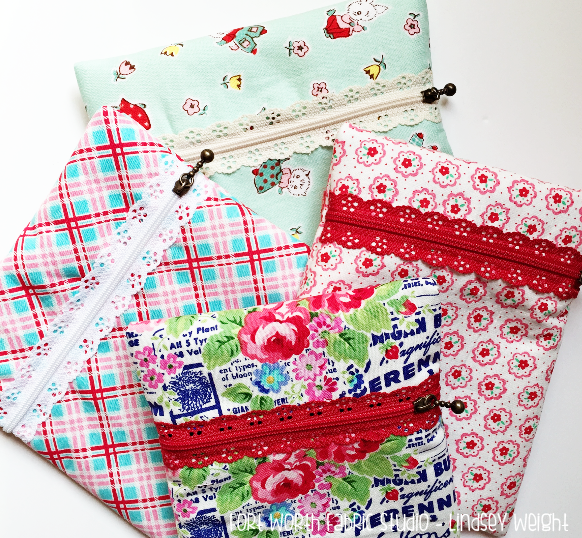
About a week ago, we got in these adorable lace zippers! I could NOT wait to use these beauties!! They are so fun, and make using zippers even easier in my opinion :) 
zipper pouch tutorial


These zippers just add a delicate touch to any zipper pouch.  They are easy to use, and come in a variety of colors! You can find the zippers we have in the shop in our notions section right HERE! 

I couldn't make just one of these lovelies, I have made four so far, and I am definitely not done! I will be making some boxed pouches next! :) 
zipper pouch tutorial

Alright, let's make one together! 

Update:  This post has become so popular, I have done some updating.  I have added a chart with different size options, these sizes reflect the picture below:


Tuesday, May 5, 2015

Toddler Apron


Heather is stopping by today to show you a little variation on my reversible apron pattern!  This is such an easy pattern and would make any toddler very happy! :)


A certain young girl in my life recently received a play kitchen, which means she needs proper accessories to play in the kitchen with.  Absolutely first on my list of items to make was an apron.


Tuesday, March 24, 2015

Quilted Footstool Tutorial

Hello, I'm Heather from Quilts Actually and I blog at QA Creations.  Today I am showing you how to make a quilted footstool to brighten up any room, and provide a valuable place to sit when playing with a 2 year old!

quilted footstool tutorial by Heather Seminelli of Quilts Actually for Fort Worth Fabric Studio

Sunday, March 8, 2015

Patchwork Pincushion Tutorial


Hi there! I hope you are enjoying your weekend!  I have had an obsession with a couple of things lately. 1. Pincushions and 2. Milk Flower Sugar.  I absolutely adore this line of fabric by the talented Elea Lutz.  It has a lovely vintage charm that I adore, and I seriously can't get enough of it!

As for pincushions, I have realized over the past couple of months, that I can not have enough of them!  I seriously only had one pincushion and would just move it wherever I needed it.  Well that just wasn't cutting it! I hated getting up to get my pincushion when I needed it, so I have made several and have them all over my sewing space!

So today, I thought I would show you how to make a small Patchwork Pincushion!


This is an easy project, that will take you no time at all to whip up!  It's also a great project for using up leftover scraps! I also think these would make perfect little gifts for your sewing and quilty friends!  


Tuesday, February 24, 2015

Quilted Oven Mitt Tutorial

Hello again, I'm Heather from Quilts Actually.  You can also find me on Facebook.  This month I am sharing a tutorial for quilted oven mitts with you.


Sunday, February 22, 2015

Fabric Basket Tutorial

Hi there! I'm Trina from Will Cook for Shoes and this is my first blog post for Fort Worth Fabric Studio. And I'm so excited to be here sharing this project for a fun fabric organizer basket with you!

The finished size is, 6 1/5" wide by 8" high by 10" long. (inches). 

Wednesday, January 28, 2015

Valentine's Day Pillow {Tutorial}


Hi there! Today I have a quick and easy project to share with you!!  I am a little obsessed with pillows.  I love making them for all the different holidays.  They add a fun holiday touch to any room in your house.  Plus they are quick! Which I love, because with three kiddos running around I don't have a ton of time to sew! So this is the perfect quick project to make while the kids are napping!

Valentine's Day Pillow

I have a love for simple blocks.  Especially the 4-patch.  So with the 4-patch in mind, I designed a quilt block just for this pillow! If you wanted to make an entire quilt from this block, it would look fabulous! :) 

Valentine's Day Pillow

Tuesday, January 27, 2015

Hanging Towel Tutorial

Hello!  I'm Heather from Quilts Actually, and I will be sharing a tutorial to make a hanging towel for your oven handle.  If your kitchen is anything like mine, the towels tend to migrate from around the room and it is nice to be able to always have at least one that isn't going anywhere.

This project is a great way to use up your favorite scraps or to introduce the holidays into your kitchen by using seasonal fabric.  It is also quick.  You can complete this project in less than an hour!


Sunday, January 18, 2015

Envelope Clutch Tutorial

Envelope Clutch Tutorial

Hi everyone! This tutorial is coming to you from Holly, and I work at Fort Worth Fabric Studio, here in the home office. You can read more about me here. I get a chance to spend a lot of time around all the beautiful fabrics we have come into the warehouse.

Sunday, January 11, 2015

Love Notes {A Free Pattern}

Hi there! I am pretty excited about my latest Valentine's Day project! I have a serious obsession with all things red and pink right now.  I can't get enough of it, and it just makes me happy! :) 

Ever since last year, when I made this heart pillow, I knew I needed to make some more projects with a fun heart design.  I changed the heart up from the one I showed you last year, but I love this one just the same.  

I also have a love affair with pinwheels. They are my absolute favorite.  It was the first block I learned how to make, and I made my first quilt with the pinwheel block.  So I decided to combine hearts and pinwheels, and this fun little runner came to life. 


Love Notes Table Runner
Love Notes - 37" x 17"

I am sure you can tell why I named this Love Notes!  I absolutely love using this fun script fabric as my background fabric.   It is perfect for this pattern.  We have a bunch of fun text prints in the shop to choose from - -  go here for our selection of text prints!


Love Notes Table Runner


I quilted this with a loopy loop pattern.  I thought I would try to do a fun heart pattern, but I couldn't get the hang of free motion quilting hearts, so I figured I would play it safe, and keep to something I know I can do! :) This would also be pretty with some straight line quilting, to keep it simple. :) 

Love Notes Table Runner

Tiny hearts for binding! This print makes my heart happy :) Unfortunately we sold out of this print, but this mini dot print would be a lovely substitute.  :) 

Love Notes Table Runner


If you'd like to make this cute runner, you can download the pattern for FREE! Click HERE to download!


If you decide to make this please email me a picture!  lindsey@fortworthfabricstudio.com

Also, use the hashtag #sewingwithfwfabricstudio on Instagram so I can see your projects! :) 

Talk to you soon!


Tuesday, January 6, 2015

Heart Garland Tutorial

Hi there! I hope you all are ready for an onslaught of Valentine's Day projects! :) I have officially caught he Valentine's Day bug, and have already started decorating my house.   Today I am going to share this fun Embroidered Heart Garland with you! 

 I had this idea come to me yesterday and I immediately got my supplies out and started stitching away! :) I finished last night, and couldn't wait to share it with you! 

Heart Garland Tutorial

This is so darn cute, and will add such a fun Valentine's Day flair to your home!  You can customize this to your own liking and use different colored floss, or put your own words in the center of the hearts.  Or you don't have to have any words in the center of your hearts at all! It's all up to you! 

Heart Garland Tutorial


Sunday, January 4, 2015

Sewing Machine Cover Tutorial

Hi there! Remember Betty, my new Bernina?  Well, it's been a few months and I decided I needed to make her a cover! 


My machine actually came with a really nice cover, but It doesn't fit well when I have my sewing machine in my table.  So I thought it would be nice to make one that would fit nicely when my sewing machine was nested in my table. 

Sewing Machine Cover

Since my machine is relatively small, it didn't take long to make my cover.  I did a simple design using strips, and used ribbon for the ties. 

Sewing Machine Cover Tutorial

There are two ties that hold the cover on, one on each side. I used a wider grosgrain black ribbon for these, but you could easily make some fabric ties too.  I just love the convenience of using ribbon!
Sewing Machine Cover Tutorial

The great thing about this pattern, is that you can easily make this as big as you need for your sewing machine, without doing any math! You, will just add more strips! I will explain how later in the post.

Sewing Machine Cover Tutorial

Now let's get started!


Thursday, December 4, 2014

18" Doll Quilt Tutorial

Hi there!  I have a fun tutorial to share with you guys today! This Christmas my two little girls are getting 18" dolls for Christmas.  My mom and I have been working on all sorts of fun things to go with the dolls for the girls.  My mom has been busy making doll clothes, and I have started making all their bedding.  And it's no ordinary bedding, these dolls are going to be sleeping with the cutest little quilts ever!

So last night,  I put on some Christmas music! (Pandora station: Alvin and the Chipmunks--yeah I'm classy like that! ;)  My second favorite station is Harry Connick Junior)  I got a bunch of colorful pinks, florals, and blues together and started sewing up this cute and very tiny Doll Quilt.


I cut all the squares 2.5" and started sewing, while listening to my favorite Christmas tunes and snacking on some chocolate!  It was so relaxing and I loved working with all these cute prints.  I have  lots of fun prints in there:  some cute cherry prints to polkadots and everything in between.  The scrappier the better, in my opinion! 

I slapped on a blue gingham border and binded it with some red polkadots.  I have to say this is the cutest little quilt, and I know my girl's are will love it!
Finished Quilt Size: 15" x 19"

Now, let me show you how I made this!

Supplies:

48 - 2.5" squares
1/4 yard for border (Cut 2" strips)
1/4 yard for binding (Cut 2.5" strips)
1 fat quarter for backing
Coordinating thread

Step 1: Cut out all your squares:


Step 2: Sew them together in a 6 x 8 layout: ( I added a cute little heart to one of my squares, just for fun, I thought my little girls would like it!)


Step 3: Add your borders.  Sew a 2" x length of quilt to each side. Then sew a 2" x width of quilt to the top and bottom.


Step 4: Baste, quilt, and bind!


So easy, and so cute! :) I am pretty sure I want a lap size quilt in all these fun colors and prints! I love how scrappy it is, and I know my girls will absolutely love their new doll quilts!


I'm off to make another one!

Talk to you soon,


Related Posts Plugin for WordPress, Blogger...